Contents
|
|
|
|
Mini Mountain Dulcimer
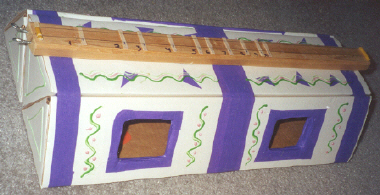
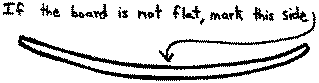
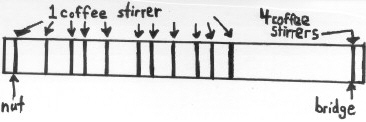
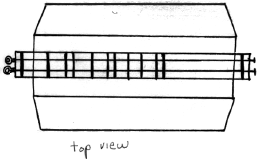
Follow these instructions to make a two string Appalachian mountain dulcimer. Materials * not included in kit Mountain Dulcimer Kit Instructions1) Apply a thin even layer of glue to all of the tabs on the triangular tubes. Fold up each of the boxes with the end tabs on the inside. Use a small piece of tape to hold each box closed. 2) Glue the three boxes together using a thin even layer on the surfaces being glued. Use masking tape to hold it together tightly while drying. The tape will be left on. (For a nice looking dulcimer, turn all the boxes so that the raw edges come together at the bottom.) 3) Sand the board. Wipe off the sawdust before proceeding to the next step. 4) Tape the template onto the board and then place a mark on the board
corresponding to each of the marks on the template. After making the
marks, remove the template. 5) If you don't have a template, mark the fretboard at the following inches from the nut: 1-3/4, 3-5/8, 4-9/16, 6-5/16, 7-1/2, 8-3/16, 9-1/4, 10-1/4, 11-3/16, 11-3/4 and 18-1/2 to the bridge. 6) Cut the coffee stirrers into fifteen 1" lengths. 7) Glue the coffee stirrers onto the fretboard at the places marked using a thin even layer of glue. Center the fret on the mark to get proper intonation. At the bridge end, glue four coffee stirrers together like a sandwich and glue this onto the mark. Press the frets down snugly against the board and allow to dry. Place something on top of the frets to keep them from curling up as they dry. 8) After the frets are dry, hammer two nails into the bridge end of the
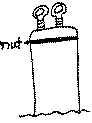
fretboard leaving 1/4" to 1/8" of the head of the nail sticking
out. 9) Start the eye screws into the other end of the fretboard. A slight tap with a hammer will aid in getting them started. Give them a few turns, but do not screw them all the way in. 10) Center the fretboard on the cardboard sound chamber and glue it on using a thin even layer of glue. Place something heavy on top of the fretboard until the glue dries. 11)
Put the guitar strings on as follows: 12) Optional: Cut out three or four sound holes. Do not make them too big because it will weaken the cardboard. Decorate the cardboard sound chamber using markers, colored tape, paint or colored hot glue. How to play a mountain dulcimer
Copyright � 2000 Satisfied Mind |